
BLOG
Yes, Peppers Thrive in Self-Watering Planters (Here's the Setup That Works)

Peppers are one of the best plants you can grow in a self-watering planter, and the single most important thing you need to get right is matching planter size to variety while using a light, porous mix that lets the wicking action actually work. Get those two things right and everything else, the reservoir management, the fertilizing rhythm, the harvest boost tricks, falls into place fast.
Here’s why this matters more than most gardeners realize: peppers hate inconsistent moisture. A wet-dry cycle from hand watering causes blossom drop and stunted fruit, while steady root-zone moisture from a self-watering system keeps flowers on the plant and fruit developing on schedule. That’s the whole case for growing peppers this way, and it’s backed by decades of extension horticulture guidance on container culture.
Before you dig into the details below, here’s a quick scan of what to do and what to avoid:
- Do choose a planter sized to your pepper variety. Compact hot peppers thrive in small to medium containers; large bell types need larger containers to accommodate their root volume.
- Do use a porous, well-draining mix (coco coir or peat plus perlite) so the wick can actually pull moisture upward.
- Don’t let the reservoir sit full and stagnant for weeks. Peppers need air at the roots, not a swamp.
- Don’t skip the overflow hole. Without one, heavy rain or an overfilled reservoir drowns your roots.
If you’d rather skip the trial-and-error phase entirely, a system like FarmDaddy’s self-watering containers handles the reservoir engineering for you, with independent water supplies for each connected planter so one thirsty pepper plant never steals water from its neighbor. The sections ahead walk through variety selection, planter features, soil recipes, and reservoir habits so you can either build your own system with confidence or shop for one knowing exactly what to look for.
Key Takeaways
Peppers grown in self-watering planters succeed when growers match container size to variety, use a porous wicking mix, and check the reservoir regularly during fruiting.
| Point | Details |
|---|---|
| Match variety to container | Compact hot peppers suit 3 to 5 gallon pots; bells need 7 to 10 gallons or more. |
| Use a porous mix | Combine coco coir or peat, perlite, and a small amount of compost for reliable wicking. |
| Hit the sunlight threshold | Give peppers 6 to 8 hours of direct sun daily for reliable fruit set. |
| Watch the reservoir during fruiting | Refill every 2 to 5 days in hot weather; flush every 4 to 6 weeks to prevent salt buildup. |
| Support plants once fruit loads | Add stakes or a small trellis without blocking the fill tube. |
| Choose an engineered system for less guesswork | FarmDaddy’s connected planters give each pepper plant its own independent reservoir and built-in overflow protection. |
Table of Contents
- How Do You Choose Pepper Varieties for Self-Watering Containers?
- What Planter Features Actually Matter for Container Peppers?
- What’s the Best Soil Mix and Fertilizer Plan for Self-Watering Peppers?
- How Do You Plant Peppers in a Self-Watering Container?
- How Often Should You Refill the Reservoir?
- What Sunlight and Temperature Do Container Peppers Need?
- Do Container Peppers Need Staking or Trellising?
- Why Do Container Peppers Get Root Rot or Blossom Drop?
- When Should You Harvest Peppers, and How Do You Boost Yield?
- What Does the Research Say About Self-Watering Systems and Peppers?
- Which Gardeners Should Actually Use Self-Watering Planters for Peppers?
- Why FarmDaddy Planters Solve the Reservoir Guesswork
- Where to Find More Grower Resources
- Frequently Asked Questions
- Sources
How Do You Choose Pepper Varieties for Self-Watering Containers?
Compact hot peppers are the easiest win in a self-watering planter, and that’s not just anecdotal. Hot pepper cultivars tend to have smaller root systems and lower nutrient demands than large bell peppers, so they tolerate the steady, moderate moisture of a sub-irrigation system without the nutrient swings that can trip up heavier feeders. Large sweet bells can absolutely work, but they need more root room and a more attentive feeding schedule to avoid lush foliage at the expense of fruit.
Here’s how to match variety to container size:
- Small patio and ornamental containers (1 to 2 gallons): Thai chilies, ornamental peppers, and dwarf jalapeño varieties.
- Mid-size planters (3 to 5 gallons): Jalapeño, serrano, cayenne, and most compact hot pepper cultivars, including varieties like Scotch bonnet, which stays relatively compact while still producing heavily.
- Large containers (7 to 10+ gallons): Bell peppers, poblano, and larger sweet varieties that need more root volume and heavier feeding to size up properly.
Garden.org’s curated pepper variety lists are a solid reference point when you’re trying to match a specific cultivar’s mature size to a container, since their grower resources break down growth habit and spacing needs by type.
Pro Tip: If you’re on the fence between a compact cultivar and a demanding bell pepper, go compact for your first self-watering season. You’ll learn your system’s refill rhythm faster with a forgiving plant, then size up to bells once you trust your setup.
One more thing worth knowing before you buy transplants: seedling size at planting matters more in containers than in-ground. A leggy, overgrown transplant crammed into a small self-watering pot will struggle to establish a root system that can reach the wicking layer. Look for stocky transplants with four to six true leaves rather than tall, spindly ones, and always harden them off before moving them into full sun.
What Planter Features Actually Matter for Container Peppers?
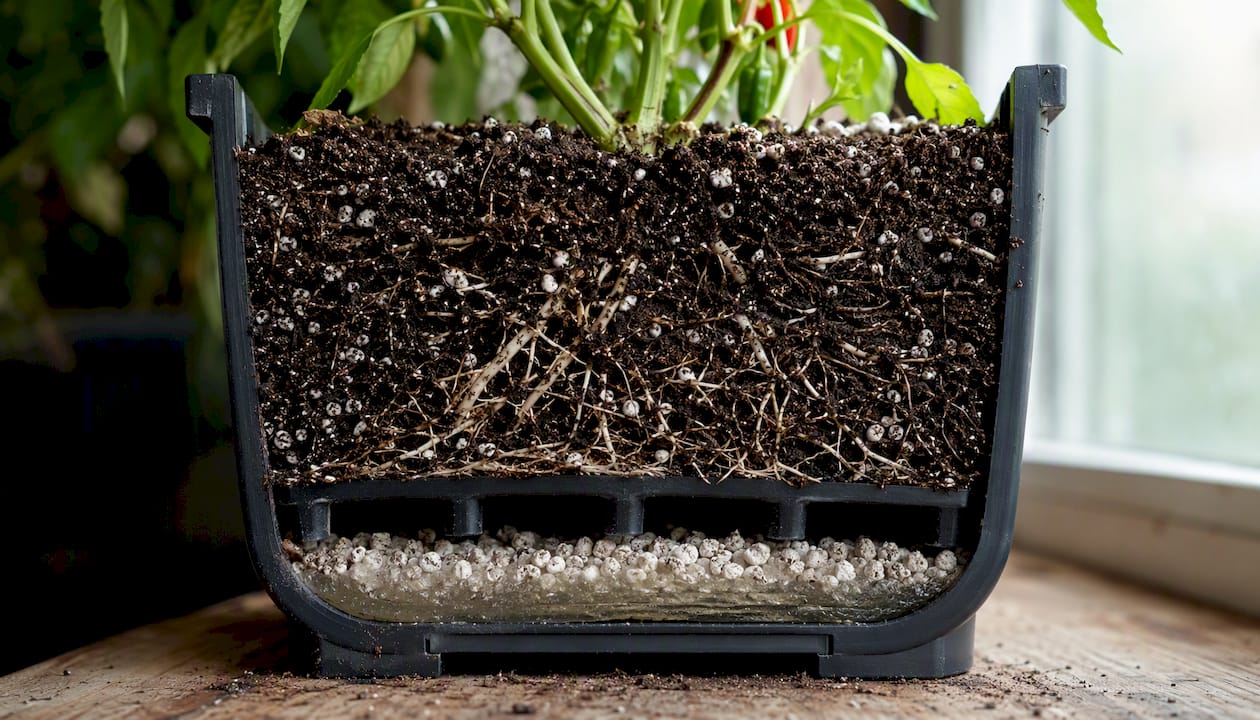
Not every self-watering container is built the same, and the differences show up fast once your pepper plant starts fruiting. The features that separate a planter that works from one that drowns your roots are the reservoir design, the wicking mechanism, aeration, and where the overflow sits.
Here’s a rough sizing guide based on gallon capacity:
| Container Size | Recommended Plants | Refill Cadence (Warm Weather) |
|---|---|---|
| 1 to 2 gallons | 1 small ornamental or dwarf pepper | Every 2 to 3 days |
| 3 to 5 gallons | 1 compact hot pepper | Every 3 to 5 days |
| 7 to 10 gallons | 1 large bell or 2 compact peppers | Every 5 to 7 days |
| 10+ gallons (garden bed style) | 2 to 4 peppers, spaced 12 to 18 inches apart | Every 7 to 10 days |
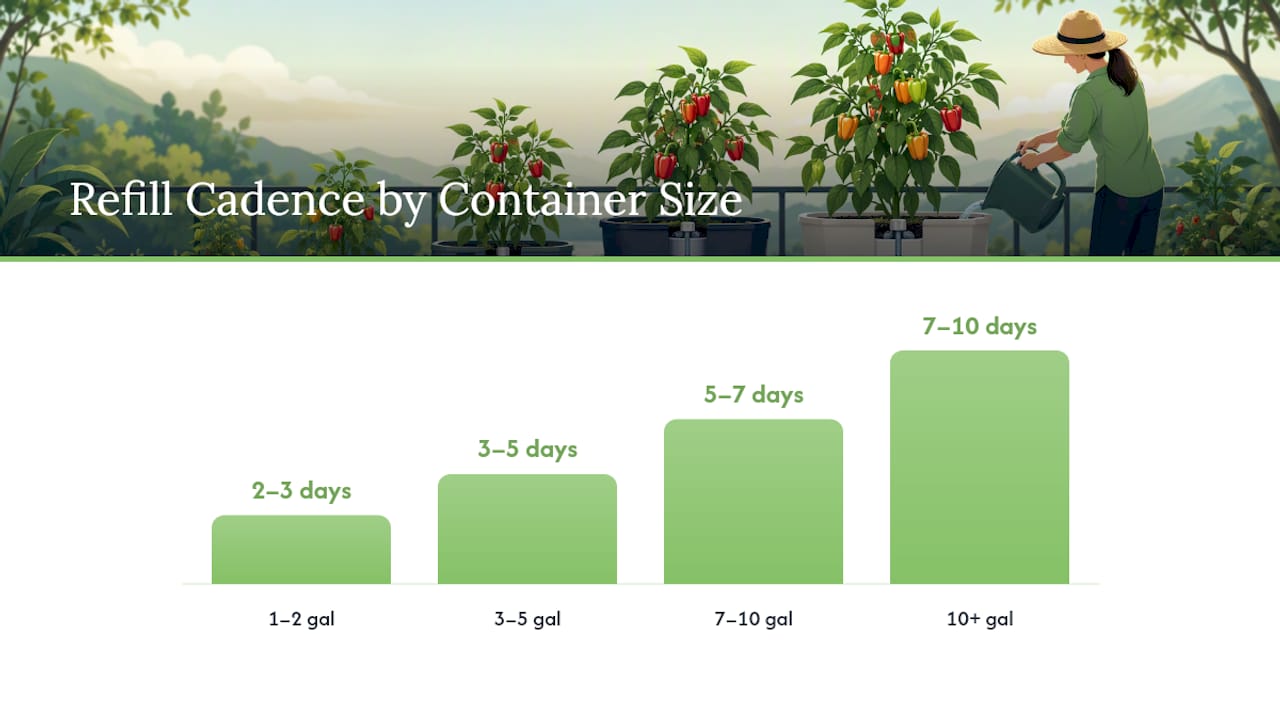
That refill window shifts fast with heat. A basic two-bucket DIY reservoir holding roughly 1 to 2 gallons can need topping off every 2 to 3 days during a July heat wave, while the same setup in cooler spring weather might go a week between fills.
When you’re evaluating a planter, whether store-bought or DIY, check for these features:
- A fill tube you can access without disturbing the plant or soil surface.
- A visible water gauge so you’re not guessing how much reservoir water remains.
- An overflow hole positioned to drain excess water before it reaches the root zone.
- Direct wicking contact between the soil mix and the water reservoir, usually through a fabric wick or capillary matting.
- Enough root-space depth for the mature variety, at least 10 to 12 inches for compact peppers and 14 inches or more for bells.
Aeration is the piece most DIY builders skip, and it’s a mistake that costs plants. Peppers need oxygen at the root zone just as much as they need moisture, and a mix packed too tight against the wick suffocates roots even while the reservoir stays full. Commercial systems like the EZ Self-Watering Tomato Planter build in calibrated air gaps between the water table and the growing medium for this reason.
Pro Tip: If you’re building your own system, add a layer of coarse perlite or a root aeration disc right above the wicking material. That extra inch of air space keeps roots from rotting even when the reservoir stays topped off through a heat wave.
DIY buckets are cheap and satisfying to build, but they trade off durability and consistency for cost. Engineered planters with calibrated wicks and independent reservoirs cost more upfront but save you the guesswork of figuring out wick tension and overflow placement through trial and error. If you want more comparison points before deciding, this rundown of self-watering planter features covers the tradeoffs in more depth.
What’s the Best Soil Mix and Fertilizer Plan for Self-Watering Peppers?
Standard garden soil is the fastest way to ruin a self-watering planter. It compacts, blocks the wick, and turns your reservoir into a swamp instead of a steady moisture source. A porous, well-aerated mix is what actually makes the sub-irrigation system function the way it’s designed to.
The mix that works best combines:
- Primarily coco coir or peat moss as the moisture-retentive base.
- A portion of perlite or vermiculite for aeration and to maintain wick function.
- A small amount of compost or worm castings to provide microbial life and nutrients.
That ratio balances water retention with the air gaps roots need, and it’s a similar formula to what FarmDaddy recommends for potting soil in its container gardening guides.
Fertilizing peppers in a self-watering system runs on a different rhythm than in-ground feeding, because nutrients can either leach out through the overflow or build up as salts in the wicking layer. Here’s a workable schedule:
- At transplanting: Mix a balanced slow-release fertilizer into the top few inches of soil to fuel early root and leaf growth.
- Midseason (first flowers appearing): Switch to a liquid feed with slightly higher phosphorus to support bloom set, applied to the soil surface rather than the reservoir.
- Peak fruiting: Shift toward a potassium-rich feed to support fruit sizing and continued flowering.
Liquid feeding directly in the reservoir is tempting because it’s low effort, but it’s also the fastest way to build up mineral salts in your wicking material over a season. Slow-release granular fertilizer worked into the top layer of soil, refreshed monthly, tends to be more forgiving for hands-off growers.
Pro Tip: Every four to six weeks, flush the reservoir completely, drain it, rinse it, and refill with plain water for one cycle. This clears out accumulated salts before they clog the wick and cause the dreaded “watered but wilting” symptom.
Watch your leaves for early warning signs. Yellowing lower leaves with slow growth usually points to nitrogen deficiency, while dark green, curling leaves with poor fruit set often signal overfertilization or a salt buildup in the root zone. Leaf tip burn is almost always a sign of excess fertilizer salts, not underwatering, even though the two can look similar at first glance.
How Do You Plant Peppers in a Self-Watering Container?
Getting the initial setup right saves you weeks of troubleshooting later. Here’s the process, step by step:
- Prep the reservoir first. Fill it completely before adding soil, so the wicking material is saturated from day one.
- Fill the growing chamber with your porous mix, firming it gently against the wicking layer without compacting it.
- Top-water once from above immediately after filling. This primes the wick and confirms water is actually reaching the top of the soil column.
- Transplant your pepper at the same depth it sat in its nursery pot, no deeper, since peppers don’t root readily from buried stems the way tomatoes do.
- Install your stake or trellis at planting time, not later, so you don’t disturb established roots or puncture the wick trying to drive a stake in after the fact.
- Water from above for the first week even though the reservoir is active, until you can see or feel that roots have reached the wicking zone.
Spacing depends entirely on container size:
- 1 to 2 gallon pots: One plant only.
- 3 to 5 gallon pots: One compact pepper plant.
- 7 to 10 gallon pots: One bell pepper, or two compact hot peppers spaced at opposite ends.
- Garden bed style planters: Space plants 12 to 18 inches apart depending on mature spread.
If you’re starting from seed, count backward from your last frost date. Peppers need 8 to 10 weeks indoors before transplanting, and starting too early leads to root-bound seedlings that struggle once moved into a self-watering setup. Buying transplants skips that wait and is often the more reliable route for a first-time self-watering grower.
How Often Should You Refill the Reservoir?
Reservoir management is where most new self-watering gardeners either succeed effortlessly or run into trouble, and the difference usually comes down to paying attention to weather and plant stage rather than following a fixed schedule.
Refill cadence shifts with conditions:
- Hot summer weeks (85°F and above): Check every 2 to 3 days, since a compact reservoir can drain fast under heavy transpiration.
- Cool spring or fall weather: Every 7 to 10 days is often enough, especially in larger reservoirs.
- Peak fruiting stage: Plants pull more water to support fruit development, so check more frequently even if the weather hasn’t changed.
- Small reservoirs (under 2 gallons): Expect to check every 2 to 4 days regardless of season.
When something goes wrong, the symptoms usually point clearly to the cause:
- Yellow leaves with wet soil: Root rot from a reservoir that’s stayed full too long without draining. Let it run dry for a day or two, then resume normal cycling.
- Blossom drop despite consistent watering: Often a temperature issue rather than a moisture one. Check for heat stress above 90°F or cold nights below 55°F.
- Wilting despite a full reservoir: The wick has likely clogged with mineral salts or debris. Time to flush the system.
- Slow growth with a healthy-looking reservoir: Check that the overflow isn’t blocked, since a clogged overflow can quietly waterlog the root zone from below.
Maintenance is simple but easy to skip. Clean the reservoir every few weeks during the growing season, checking the overflow for debris and looking for early algae growth, which thrives in warm, sunlit reservoirs and can gradually clog wicking material.
Pro Tip: Heading into winter or planning a long trip? Top the reservoir off completely rather than leaving it half full. A fully saturated wick keeps working for days longer than a half-empty one, buying you extra time before your next check-in.
What Sunlight and Temperature Do Container Peppers Need?
This is the one rule a self-watering system can’t fix for you. Peppers need 6 to 8 hours of direct sunlight daily to set fruit reliably, and no amount of perfect watering makes up for a shady balcony. Light, not moisture, is the primary driver of fruit set and plant vigor in peppers, and that extension-backed threshold holds true whether you’re growing in-ground or in a container.
That same guidance points to a typical harvest window from transplant to ripe fruit that varies depending on variety, providing a useful benchmark for planning your season around local frost dates.
Temperature ranges that matter for fruiting:
- Daytime: 70 to 85°F is the sweet spot for flowering and fruit set.
- Nighttime: Stay above 55°F. Below that, flowers often drop before pollination completes.
- Above 90°F: Fruit set slows or stalls entirely, even with perfect watering and light.
Placement tips that make a real difference on balconies and patios: position containers to catch mid-day sun rather than only morning or evening light, and avoid corners where reflected heat from concrete or vinyl siding pushes soil temperatures dangerously high. Indoors, a south-facing window rarely provides enough light on its own, so growing peppers indoors usually means supplementing with a grow light running 14 to 16 hours a day to hit that 6 to 8 hour effective light threshold.
This single move often keeps fruit set going through a heat wave, which would otherwise stall your plants for weeks.
Do Container Peppers Need Staking or Trellising?
Once fruit load builds up, an unsupported pepper plant is one strong gust away from a snapped stem. Support isn’t optional for most productive varieties once they’re loaded with fruit, and getting it right also improves airflow around the foliage, which cuts down on fungal issues in humid climates.
Match support to container and plant size:
- Small pots (1 to 3 gallons): A single bamboo stake or a small tomato cage works fine for compact varieties.
- Mid-size planters (3 to 7 gallons): A tomato cage or a small trellis gives branching varieties room to spread without toppling.
- Balcony and railing setups: Tether the main stem loosely to a railing or wall bracket using soft garden twine.
- Larger bell pepper containers: A sturdier trellis or a stake driven deep at planting time, since bells carry heavier fruit loads than most hot peppers.
Pruning works alongside support to manage plant shape. Pinch the growing tip once the plant reaches 8 to 10 inches tall to encourage branching, and remove any branches growing inward toward the center of the plant to open up airflow. Heavier pruning trades some leaf area for better light penetration to developing fruit, which usually pays off in a container setting where light is already at a premium.
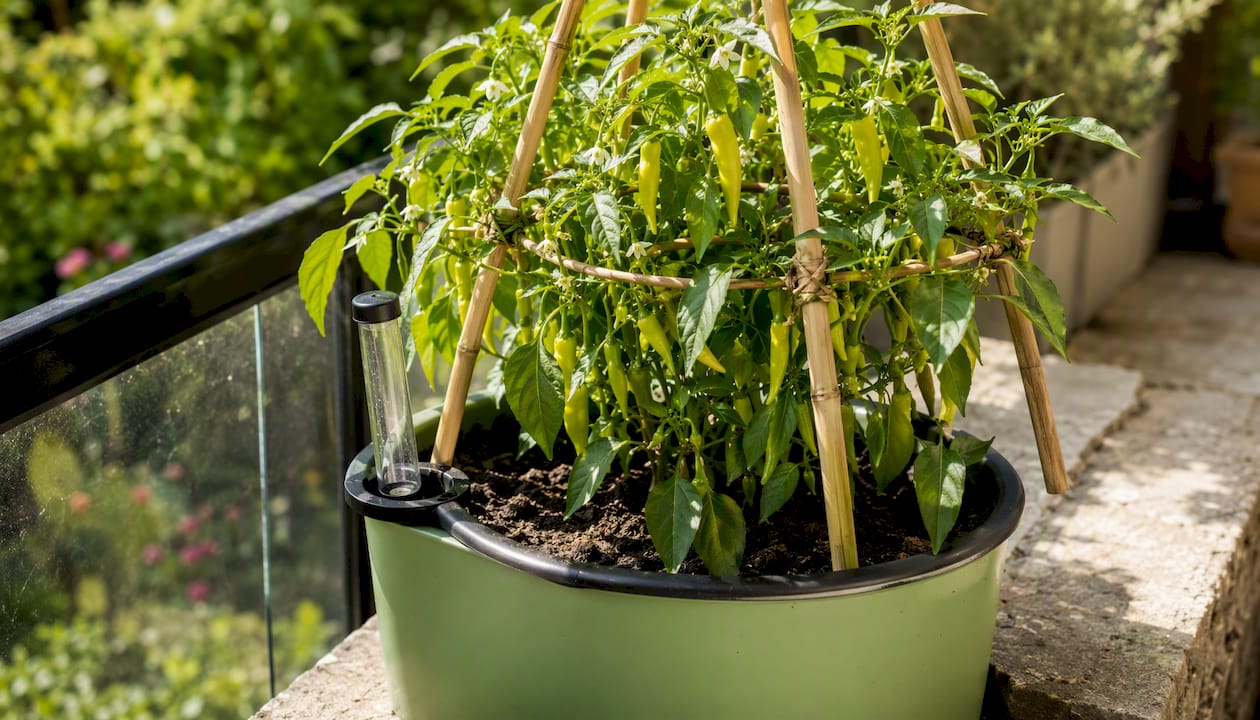
The trick with self-watering planters specifically is keeping your support structure clear of the fill tube and water gauge. A trellis positioned directly over the fill access point turns every refill into an awkward reach-around. For a simple setup in a 5 to 7 gallon planter, a three-legged bamboo tripod positioned around the plant, tied at the top, gives sturdy support while leaving the fill tube fully accessible.
Why Do Container Peppers Get Root Rot or Blossom Drop?
Self-watering systems solve the wet-dry stress problem, but they introduce a different set of risks if you’re not paying attention: stagnant water, clogged wicks, and mineral buildup that a traditional hand-watered pot never has to deal with.
| Symptom | Likely Cause | Fix |
|---|---|---|
| Yellow lower leaves, soggy soil | Root rot from standing water | Let reservoir run dry briefly, check overflow function |
| Blossom drop, healthy foliage | Heat or cold stress | Adjust placement, add shade or wind protection |
| Wilting despite full reservoir | Clogged or mineral-crusted wick | Flush reservoir, replace wick if severely crusted |
| Stunted growth, pale leaves | Nitrogen deficiency | Apply balanced slow-release fertilizer to soil surface |
| Dark curled leaves, few fruit | Overfertilization or salt buildup | Flush reservoir and soil with plain water |
| Sudden leaf drop, sticky residue | Aphids or spider mites | Inspect undersides, use insecticidal soap |
For pest control in a container setting, moving fast matters more than reaching for the strongest product on the shelf. Inspect leaf undersides weekly during warm months, isolate any plant showing early pest activity from the rest of your setup, and start with a soft response like insecticidal soap or a strong water spray before escalating. Extension guidance on container peppers covers common pest identification for home growers in more detail, including aphids, spider mites, and pepper weevils.
The disease risks specific to self-watering systems mostly trace back to stagnant reservoirs, algae buildup in sunlit water chambers, and mineral crust forming where the wick meets standing water. All three are preventable with the flushing routine covered earlier.
As for when to repot versus troubleshoot in place: if you’re dealing with an isolated symptom like yellowing leaves or minor pest activity, a corrective fix usually solves it within a week or two. If you’re seeing persistent root rot smell, visible mold on the wick, or a plant that’s stalled for a month despite corrections, it’s faster to repot into fresh mix than to keep chasing the problem in contaminated soil.
When Should You Harvest Peppers, and How Do You Boost Yield?
Most peppers can be picked green, but full color, red, orange, yellow, or purple depending on variety, means full ripeness and typically the sweetest or hottest flavor, depending on the type. That color shift usually happens within the same 60 to 90 day window from transplant that governs the whole growing cycle, though hotter varieties and larger bells can run toward the longer end of that range.
A few techniques reliably push container yields higher:
- Prune selectively early in the season to shape the plant, then stop heavy pruning once fruit set begins in earnest.
- Keep reservoir levels steady during fruiting. This is the single stage where inconsistent moisture does the most damage to fruit development.
- Add a potassium and phosphorus boost once flowering starts, since these two nutrients drive bloom and fruit sizing more than nitrogen does.
- Hand-pollinate in low-breeze spots like enclosed balconies or indoor setups by gently shaking flower clusters or using a small brush to transfer pollen between blooms.
Pro Tip: Pick mature fruit as soon as it’s ready rather than letting it hang on the plant. Removing ripe peppers signals the plant to keep producing flowers, while fruit left too long slows down the whole plant’s output.
For peak season, a quick do/don’t list keeps things simple:
- Do harvest every few days once fruit starts ripening, rather than waiting for a big batch.
- Do keep feeding through the fruiting stage. Peppers are heavy feeders once loaded with fruit.
- Don’t let the reservoir run bone dry during peak fruiting, even for a day, since that’s when moisture stress does the most damage to developing fruit.
- Don’t over-prune once fruit set is heavy. You’ll lose the leaf canopy that protects fruit from sunscald.
What Does the Research Say About Self-Watering Systems and Peppers?
The core mechanism behind why self-watering planters work so well for peppers comes down to eliminating the wet-dry cycle that causes physiological stress in the plant. When roots go from soaked to bone dry and back again, the plant responds by dropping blossoms and slowing fruit development as a stress response. A steady, moderate moisture level at the root zone removes that trigger entirely, which is why growers consistently report more reliable fruit set with sub-irrigation compared to hand watering.
Extension horticulture programs back this up with practical guidance rather than just anecdote. Utah State University Extension’s guidance on peppers in the home garden outlines container-specific cultural practices, from spacing to pest identification, that apply directly to self-watering setups. Ohio State University Extension’s factsheet on container pepper production is the source behind the 6 to 8 hour sunlight rule and the 60 to 90 day harvest timeline referenced throughout this guide, two numbers worth writing on a sticky note near your growing space if you’re new to peppers.
Consistent root-zone moisture, not just more water overall, is what separates a pepper plant that fruits reliably from one that flowers heavily but drops most of its blossoms before fruit ever forms. That’s the mechanical reason self-watering systems outperform hand watering for this particular crop, even when total water applied over a season ends up roughly similar.
Grower community experience backs this up in less formal but equally useful ways. Threads on gardening forums and community groups repeatedly surface the same lessons covered in this guide: heavy garden soil compacts and kills the wick, aeration gaps matter more than growers expect going in, and compact hot peppers forgive setup mistakes far more readily than large bells do.
Sunlight and timeline at a glance: 6 to 8 hours of direct sun daily, with a 60 to 90 day window from transplant to first harvest, are the two extension-backed numbers that should anchor your container placement and season planning.
Which Gardeners Should Actually Use Self-Watering Planters for Peppers?
I’d point almost any home gardener growing peppers in containers toward a self-watering setup, but the fit is strongest for three specific situations: frequent travelers who can’t guarantee daily watering, busy urban gardeners managing a balcony or patio setup around a work schedule, and anyone who has struggled with inconsistent fruit set from hand-watered pots in past seasons.
The technical sections above make the case pretty clearly. Variety selection matters because a demanding bell pepper in a poorly aerated DIY bucket will struggle in ways a compact hot pepper simply won’t. Reservoir sizing matters because a 1 gallon reservoir in July heat is a different maintenance commitment than a 5 gallon one. And fertilization mindfulness matters because the same system that solves your watering problem can just as easily build up salt if you’re not flushing it periodically.
Where I’d hold back: if you’re growing a single ornamental pepper on a windowsill and you genuinely enjoy the daily ritual of hand watering, a self-watering system solves a problem you don’t have. But for anyone managing multiple containers, an unpredictable schedule, or a track record of blossom drop from uneven watering, a system with engineered reservoirs like FarmDaddy’s connected planters removes the single biggest variable that trips up container pepper growers.
Why FarmDaddy Planters Solve the Reservoir Guesswork
Everything covered above, sizing your reservoir, calibrating your wick, flushing out mineral buildup, is exactly the operational overhead FarmDaddy’s self-watering containers are built to remove.
Each connected planter runs its own independent reservoir, so a thirsty pepper plant never siphons water away from a neighboring herb or tomato in the same setup. That solves the uneven moisture problem this guide keeps coming back to, without you having to manually monitor multiple gauges. The fill tube and water-level indicator are built in and easy to access, so checking your reservoir takes seconds instead of guesswork, and the overflow protection means an unexpected downpour won’t drown your roots while you’re at work or traveling.
If you’re managing a single balcony pepper plant, the 2-Planter Self Watering Garden System gives you room for a compact hot pepper and a companion herb side by side. Frequent travelers or anyone managing multiple pepper varieties across a patio should take a look at the full lineup on the FarmDaddy self-watering container page to find the size that matches the varieties you picked earlier in this guide.
Where to Find More Grower Resources
- Ohio State University Extension factsheet on peppers: The source for the 6 to 8 hour sunlight rule and the 60 to 90 day harvest window referenced throughout this guide.
- Utah State University Extension guide to garden peppers: Covers cultural practices, pest identification, and nutrient troubleshooting for home growers.
- Garden: A grower-curated list matching pepper cultivars to container size and climate.
- National Gardening Bureau’s pepper growing guide: Practical tips on feeding schedules and spacing for home gardens.
Frequently Asked Questions
Can you grow bell peppers in a self-watering planter, or only hot peppers? Bell peppers grow well in self-watering planters, but they need a larger container, 7 to 10 gallons or more, and a more attentive feeding schedule than compact hot pepper varieties. Hot peppers are simply more forgiving for a first-time self-watering setup.
How many peppers can you grow indoors with a self-watering planter? Indoors, plan for one plant per 3 to 5 gallon container unless you’re using a wider garden bed style planter. Growing peppers indoors also requires supplemental grow lighting, since few windows deliver a full 6 to 8 hours of effective light.
What’s the ideal watering schedule for peppers in a self-watering system? There’s no fixed daily schedule since the reservoir handles day-to-day moisture. Instead, check the water gauge every 2 to 3 days in hot weather and every 7 to 10 days in cooler conditions, refilling whenever the reservoir drops low.
Why are my container peppers dropping flowers even though the reservoir is full? Blossom drop usually points to temperature stress rather than a watering problem, either heat above 90°F or nighttime temperatures dipping below 55°F. Check placement and consider temporary shade or a wind break before assuming it’s a moisture issue.
Do self-watering planters work for growing peppers indoors year-round? Yes, as long as you pair the planter with a reliable grow light running 14 to 16 hours daily to make up for the lack of natural direct sun. The reservoir handles moisture consistency, but light remains the limiting factor for indoor peppers.
Sources
- Ohio State University Extension — HYGI-1618
- Utah State University Extension — Peppers in the garden
- Garden

