
BLOG
Self-Watering Containers: Grow More With Less Daily Watering

Yes. A properly set up self-watering reservoir container keeps your root zone evenly moist and can cut your watering chores dramatically compared to top-watering by hand. Industry observations show these systems can reduce total water use by up to 50% once they’re primed and running. This guide walks you through what to plant, how to set up and prime the wick, realistic refill rhythms, and quick fixes when something goes sideways.
Key Takeaways
Self-watering reservoir containers succeed when the wick is properly primed, the plant matches the moisture level, and refills follow the reservoir’s actual behavior rather than a fixed calendar.
| Point | Details |
|---|---|
| Priming comes first | Top-water the soil for the first one to two waterings before relying on the reservoir alone. |
| Match plants to the system | Herbs, greens, tomatoes, and peppers thrive; succulents and rosemary generally do not. |
| Water savings are real | Reservoir systems can cut water use by up to 50% compared to top-watering. |
| Watch, don’t guess | Use overflow checks, fill indicators, or pot weight to time refills instead of a strict schedule. |
| Farmdaddy simplifies setup | Its independent-container design handles overflow control and reservoir sizing per plant automatically. |
Table of Contents
- What Makes Rainwater for Container Garden Setups So Effective?
- Which Plants Thrive (and Which Ones Struggle) in Self-Watering Pots?
- How Do You Set Up and Prime a New Self-Watering Planter?
- How Often Should You Refill the Reservoir?
- Why Is My Self-Watering Planter Getting Soggy or Growing Algae?
- How Much Water Do Self-Watering Containers Actually Save?
- How Do You Pick the Right Size and Type of Container?
- How Should You Fertilize Plants in a Self-Watering Container?
- How Do You Monitor and Adjust Watering Levels?
- How Do You Winterize a Self-Watering Container?
- Why Farmdaddy Makes This Whole System Easier
- Sources
What Makes Rainwater for Container Garden Setups So Effective?
The magic behind a self-watering reservoir planter isn’t magic at all. It’s basic capillary action, the same force that lets a paper towel soak up a spill from across the counter. When you’re using rainwater for container garden setups or straight tap water, the container design does the heavy lifting so you don’t have to check on plants every day.
Every self-watering planter has two chambers: a soil chamber on top where your plants live, and a water reservoir below. A wick, a fabric strip, or a soil bridge connects the two, drawing moisture upward as the soil dries out. Roots pull exactly what they need, when they need it, instead of getting flooded right after watering and then bone dry three days later.
Two small features make the whole system safe to leave alone:
- An overflow hole stops the reservoir from filling past capacity, so heavy rain or an overzealous refill never drowns your roots.
- A fill tube or fill port lets you top off the reservoir without disturbing the soil surface or your plants’ leaves.
Because water moves up from below instead of down from above, less of it evaporates off the topsoil or runs out the drainage holes. Nutrients you’ve fed your plants stay in the root zone longer instead of washing away with runoff, which is one reason container vegetables in these systems often look noticeably better fed by midseason.
Pro Tip: Check that your reservoir sits in shade or is made from opaque material. Sunlight hitting standing water is what triggers algae, not the water itself.
Which Plants Thrive (and Which Ones Struggle) in Self-Watering Pots?
Not every plant wants consistently moist roots, so matching the plant to the system matters as much as the setup itself. Colorado State University Extension notes that moisture-loving vegetables and many houseplants do well in wicking systems, while plants adapted to dry, sandy soil tend to struggle.
Plants that generally thrive in a reservoir container:
- Leafy herbs like basil, parsley, cilantro, and mint
- Salad greens, including lettuce, spinach, and arugula
- Compact and determinate tomato varieties bred for containers
- Peppers, both sweet and hot
- Most annual flowers, including petunias, marigolds, and impatiens
- Tropical foliage plants that prefer even moisture
Plants that usually do poorly:
- Succulents and cacti, which need to dry out completely between waterings
- Mediterranean herbs like rosemary, lavender, and thyme, which rot in constantly damp soil
For a school garden or a mixed patio setup, group plants by moisture preference rather than by type. A tomato and a basil plant pair beautifully in one reservoir system. A tomato and a rosemary plant do not.
How Do You Set Up and Prime a New Self-Watering Planter?
Priming is the one step new gardeners skip, and it’s the reason so many first-time users think their planter “isn’t working.” The wick needs direct, saturated contact with the soil before capillary action can do its job.
- Confirm the overflow hole and fill tube are clear. A blocked overflow is the top cause of soggy, rotting roots later on.
- Fill the soil chamber with a lightweight potting mix, ideally a peat or coir blend with added perlite for aeration. Dense garden soil chokes the wick and won’t wick water properly.
- Pack soil firmly around the wick or soil bridge so there are no air gaps between it and the surrounding mix.
- Top-water the soil directly for the first one to two waterings, soaking it thoroughly from above rather than filling the reservoir first. The University of Maryland Extension documents this exact priming step in its tested self-watering bucket design, since the soil needs full saturation to establish wick contact.
- Fill the reservoir through the fill tube once the topsoil has been saturated.
- Test drainage by watching the overflow hole after filling. Water should trickle out, not pool on top of the soil.
- Mark your expected refill interval based on container size so you’re not guessing later.
Pro Tip: If your plant wilts even though the reservoir is full, don’t add more water to the top. Repeat the top-watering priming step instead. The wick has likely lost contact with the soil, and more reservoir water won’t fix a broken connection.
How Often Should You Refill the Reservoir?
Refill frequency depends heavily on container size, plant type, and the weather, so there’s no single answer that fits every setup. Reported refill windows run from every three to five days for small herb reservoirs up to ten to fourteen days for large, multi-gallon reservoirs in moderate conditions.
A few patterns hold true across most setups:
- Small herb pots in full summer sun often need topping off every few days.
- Larger, one-gallon-plus reservoirs supporting tomatoes or peppers usually stretch to a week or two.
- Hot, windy weeks speed up transpiration and shrink the interval; cool, cloudy stretches extend it.
- In winter or during dormancy, let the reservoir run closer to empty for a few days at a stretch. Constant saturation in cold months invites root rot rather than growth.
Rather than sticking to a rigid calendar, use the overflow hole, a water-level indicator, or simply the weight of the pot to judge when it’s time. A container that feels noticeably lighter than usual is telling you something. Since these systems already trim water use by up to half compared to daily top-watering, a slightly late refill rarely causes real damage. The reservoir buys you a buffer, not a deadline.
Why Is My Self-Watering Planter Getting Soggy or Growing Algae?
Most problems in a reservoir system trace back to one of four issues, and each has a fast fix.
- Algae or mosquito larvae in the reservoir: Keep the reservoir shaded or opaque, add a Bti dunk, or drop in a small amount of vegetable oil to break the surface tension mosquitoes need to lay eggs. Flush the reservoir every few weeks.
- Soggy topsoil despite normal refills: Check that the overflow hole isn’t blocked, and mix more perlite into the soil to improve aeration. Let the reservoir run dry for a day or two to reset.
- Dry topsoil even with a full reservoir: The wick has lost soil contact. Re-prime by top-watering directly and repacking soil firmly around the wick.
- White, crusty salt buildup on the soil surface: Flush the reservoir periodically with plain water, and never pour concentrated liquid fertilizer straight into the fill tube.
Pro Tip: Keep a small notepad or phone note tracking your refill dates for the first month. Once you know your rhythm, you won’t need it again.
How Much Water Do Self-Watering Containers Actually Save?
The headline number worth remembering is a reduction in water use of up to 50% compared to traditional top-watering. That figure comes from the basic mechanics of the system: water moves from reservoir to root zone with almost no evaporation off open soil and no runoff spilling out the bottom of the pot.
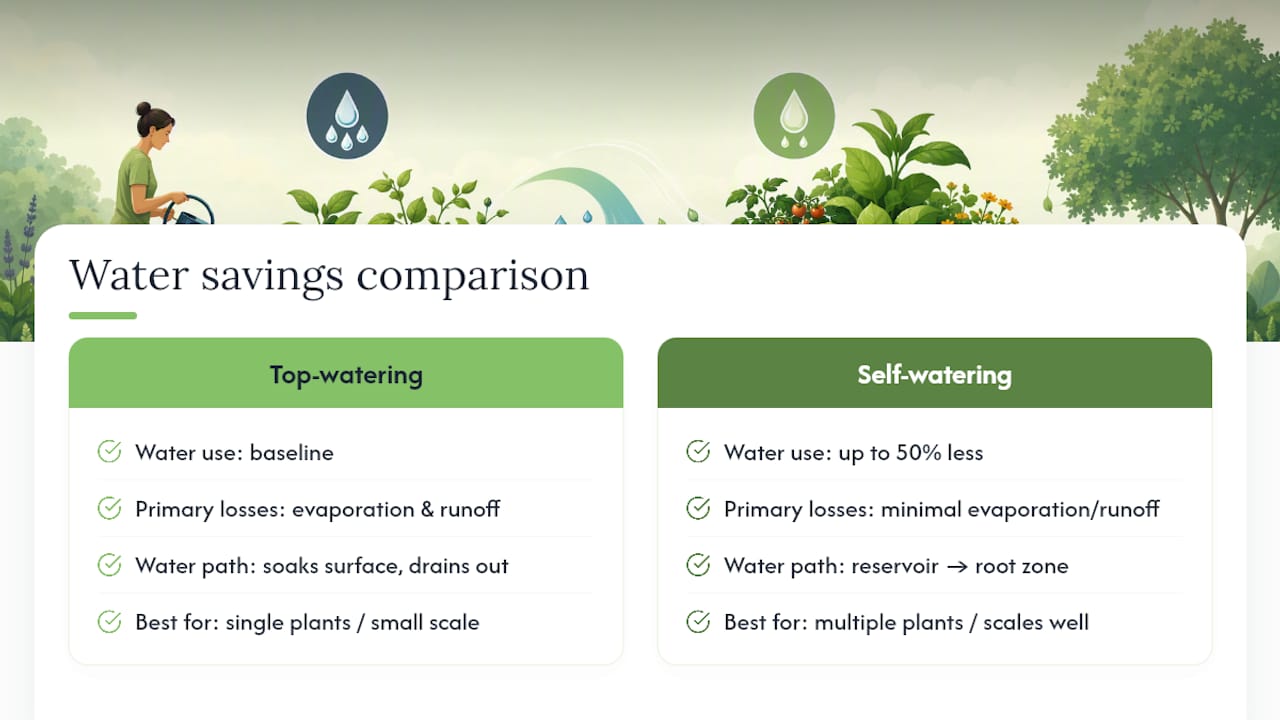
That savings adds up fastest for anyone growing more than a plant or two, since traditional container gardening tends to waste water two ways. Watering from above soaks the top layer of soil before gravity pulls the excess straight out the drainage holes, and a good portion evaporates off the surface before roots even reach it. A reservoir system routes water directly to where roots are actively growing, so almost none of it is wasted.
Safety and maintenance stay simple as long as you follow a few basics. Never let a reservoir sit bone dry for weeks with a plant still growing in it, since the wick can crack or the soil bridge can compact and lose its ability to draw water back up. Check overflow holes seasonally to make sure they haven’t clogged with soil or roots. And if you’re using tap water treated with heavy chlorine, letting it sit uncovered for a day before filling the reservoir gives some of the chlorine time to dissipate, which many gardeners find gentler on beneficial soil microbes.
How Do You Pick the Right Size and Type of Container?
Container size should match both your plant’s mature root system and how often you’re realistically willing to check on it. A shallow, small-reservoir pot suits herbs and greens that have compact roots and don’t mind more frequent refills. A tomato or pepper plant, on the other hand, needs both a deeper soil chamber for root development and a reservoir large enough to avoid drying out during peak summer transpiration.
A few practical guidelines make the decision easier:
- Deep-rooted vegetables like tomatoes and peppers need at least a five-gallon soil chamber paired with a reservoir sized to match, so roots have room to spread and moisture stays available longer.
- Shallow-rooted crops like lettuce and herbs do fine in smaller footprints, which also makes them ideal for patios, balconies, and classroom windowsills.
- Opaque or dark-colored reservoirs slow algae growth far better than clear or light-colored plastic, since light exposure is what fuels algae blooms in standing water.
- A visible fill tube or water-level indicator saves guesswork, especially for schools or households where more than one person handles watering duty.
Material matters too. Sturdy, UV-stable plastic holds up to seasons of sun exposure without cracking, while thinner containers degrade and can develop leaks around the reservoir seams within a year or two. If you’re setting up a container garden without an outdoor faucet, look for a design with a wide fill opening that accepts a watering can or pitcher directly, since you’ll be hauling water from indoors rather than running a hose.
How Should You Fertilize Plants in a Self-Watering Container?
Fertilizing a reservoir-fed container works differently than fertilizing a traditional pot, mostly because nutrients don’t wash out the bottom the way they do with top-watering. That closed-loop moisture cycle means nutrients tend to stay in the root zone longer, which can support stronger growth, but it also means over-fertilizing is easier to do by accident.
Slow-release granular fertilizer mixed into the topsoil at planting time is the simplest approach for most home gardeners. It breaks down gradually with each watering cycle instead of dumping a concentrated dose all at once. For plants that need an extra boost during peak fruiting, a diluted liquid feed applied directly to the soil surface every two to three weeks works well, but resist the urge to pour it into the fill tube.
Concentrated fertilizer poured straight into the reservoir sits in standing water and can build up as salt residue on the wick and soil bridge over time, gradually reducing how well the system wicks moisture. If you do want to feed through the reservoir, dilute the fertilizer more than the label suggests and flush the reservoir with plain water afterward. Organic, compatible fertilizers formulated for container gardening tend to be gentler on the wicking mechanism than synthetic blends with heavy mineral salts.
How Do You Monitor and Adjust Watering Levels?
The two most reliable signals in a self-watering system are the fill tube’s water-level indicator and the weight of the container itself. A clear or marked indicator tube tells you at a glance how full the reservoir is without needing to guess or dig into the soil. If your planter doesn’t have one built in, a simple wooden dowel dropped into the fill tube and pulled back out works as a makeshift gauge, similar to checking oil in a car.
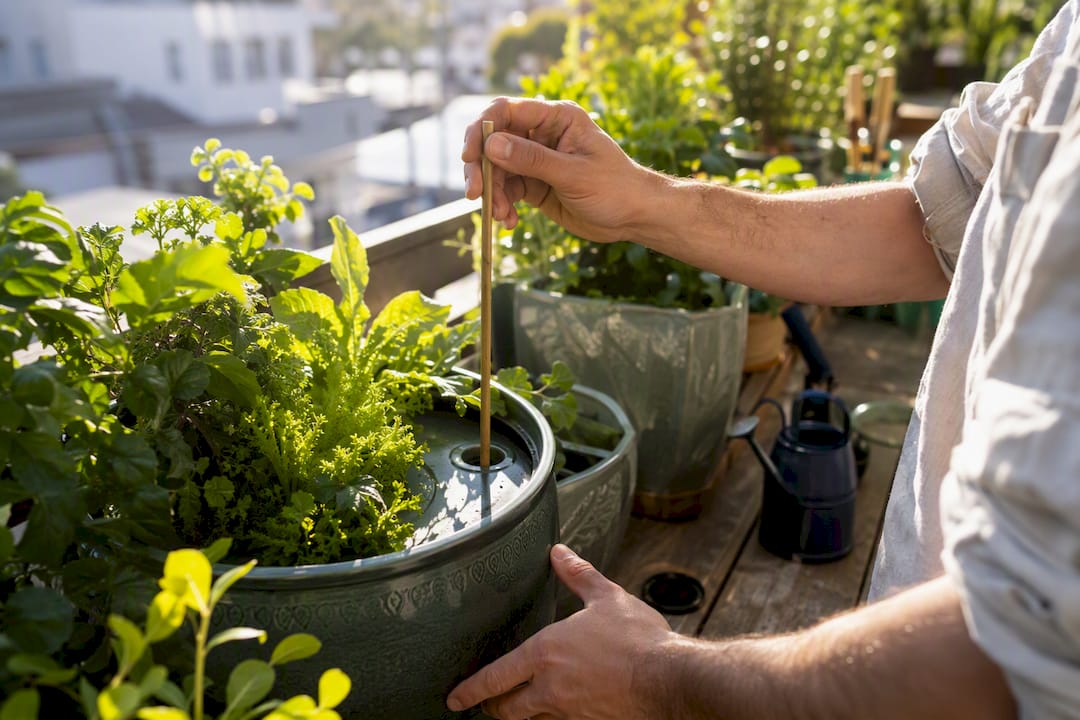
Soil moisture at the surface tells a different story than the reservoir level, and both matter. Top few inches drying out while the reservoir stays full is normal and expected, since the wicking action pulls moisture upward gradually rather than keeping the entire soil column uniformly wet. But if the topsoil stays dry for more than a day or two after a refill, that’s the sign the wick has lost contact and needs re-priming.
Weather shifts call for real adjustments, not just reactive ones. A stretch of 90 degree days means checking the reservoir every couple of days instead of waiting for your usual weekly cycle. A cool, rainy week might mean skipping a scheduled refill entirely. Treat the refill schedule as a rough guide you fine-tune by watching your specific plants respond, not a fixed rule you follow blindly.
How Do You Winterize a Self-Watering Container?
Cold weather changes what your reservoir system needs, and skipping winterization is one of the fastest ways to crack a planter or kill overwintered plants. As temperatures drop, water expands when it freezes, and a reservoir full of standing water is exactly the kind of trapped moisture that splits plastic seams or cracks ceramic containers.
Before the first hard freeze hits your area, drain the reservoir completely if you’re storing the container empty for winter. For planters holding cold-hardy herbs or perennials you’re overwintering outdoors, let the reservoir run low intentionally rather than keeping it topped off, since prolonged saturation combined with freezing temperatures is far more damaging to roots than a brief dry spell.
If you’re bringing containers indoors for the winter, reduce refill frequency significantly since indoor plants in lower light and cooler temperatures use far less water than they did outdoors in summer. Check the wick and soil bridge for any dampness that could encourage mold in the low-airflow environment of a garage or basement. Empty, clean, and dry any reservoirs you’re storing away completely, since leftover water sitting stagnant all winter is what breeds algae and odor by spring. A quick reservoir flush and dry-out before storage means your system is ready to prime again the moment planting season returns.
A Practical Starting Point for New Growers
Start with one herb pot or a single container tomato before you scale up to a full setup. That first container teaches you your own refill rhythm and shows you exactly how the wick behaves in your specific climate and light conditions. Match your plant choice to your reservoir size and sun exposure from the start, since a mismatch there causes more headaches than almost anything else covered here.
Why Farmdaddy Makes This Whole System Easier
Everything covered above, priming, refill timing, overflow control, plant matching, comes standard in Farmdaddy’s design instead of being something you have to engineer yourself. Farmdaddy’s patented independent-container system means each planter manages its own reservoir separately, so a thirsty tomato never steals water meant for a herb pot sitting right next to it.
Every Farmdaddy planter ships with a built-in overflow safeguard and a fill tube designed for exactly the priming process described earlier, so your first one to two top-waterings set the wick correctly from day one. Reservoir sizing is matched to common plant groupings, whether you’re growing a self-watering vegetable garden full of tomatoes and peppers or a compact herb setup on a balcony with no outdoor faucet in sight. If you want to see the full lineup, the self-watering garden box is a solid starting point for one or two plants, and it ships ready to fill and plant the same day it arrives.
Sources
- University of Vermont (industry observation cited)
- University of Maryland Extension — Self-watering containers
- Colorado State University Extension

